
Triple Wilson SVVCF Features
Squeezing Out the Bang For the Panel Space
The Triple SVVCF module turned out to be one of my most challenging projects, and for good reason. The module was designed to be as versatile as possible. Through the use of switching jacks and custom audio and control boards, the module can be configured in a large number of ways in order to be useful in just about any patch I produce on my modular.
The basic default configuration is of a triple bandpass filter with voltage controled resonance. Each of the filters, however, can be used independently or in any combination. Each filter produces the standard LP, BP and HP outputs, and the filters can be operated in series or in parallel, or in series/parallel, depending on the patch.
In addition, the module provides facilities for control voltage and audio signal mixing with both stereo and mono outputs. Again, depending on the patch, these functions can be combined with the filter applications in various capacities.
In order to facilitate this functionality, the control surface is rather dense.
The panel illustration below is configured to allow one to both view a short description of each control and connector and to navigate to the part of this page that describes the function. Place the mouse over a control and short message conveying the name of the control or connector will be displayed. Right click over any control or connector, and the section of the page describing the functionality of that control or connector will be brought into focus.
Audio elements
There are three main audio inputs and three filters. The inputs are labeled 1, 2 and 3. The filters are labeled A, B and C.
The three audio inputs are mixed together, and the mixed output of these three inputs is normalled to be applied to the input of all three filters in parallel.
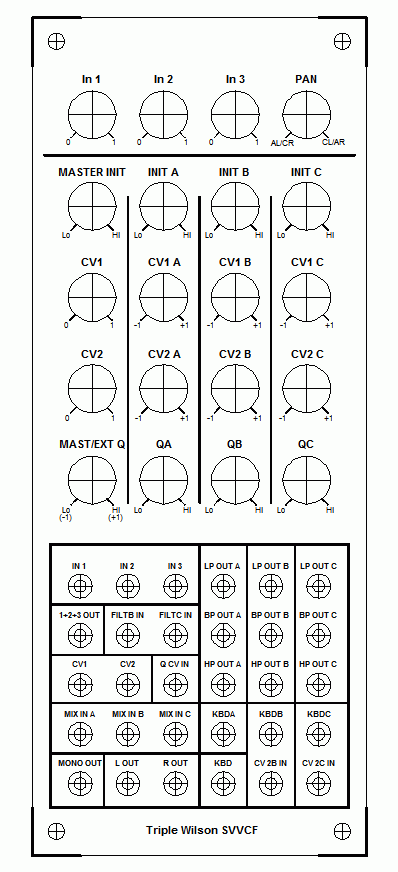
Above is an illustration of the input level controls. Don't worry too much about the Pan control on the right, that's an output control and will be covered later.

The level of the signal applied to the In 1 connector is controlled by the In 1 control, the level of the signal applied to the In 2 connector is controlled by the In 2 control, and the level of the signal applied to the In 3 connector is controlled by (all together now) the In 3 control.
Notice there are two additional input connectors labeled FiltB In and FiltC In. If a cable is connected to the FiltB input, the mixed signal from the input mixer (a mix of signals 1, 2 and 3) is disconnected from the input of Filter B, and the signal on the cable is directly applied instead. The same thing happens with the FiltC input, only the signal applied there is automatically directed to the input of Filter C, bypassing the mixed 1, 2, and 3 signal. This arrangement allows each of the filters to be individually used - Filters B and C can now process signals independently. Filter A does not have an individual input, because we still have the mixed input to it - therefore all three filters can process totally different input signals.
Note that Filter B and Filter C do not have dedicated input level controls when the FiltB and FiltC inputs are used. If input leveling is required, my synth can provide that through a mixer, for example. There is another reason these input connectors are there, other than for individual operation.......
Before we move on, notice the one extra connector labeled 1+2+3 Out. This connector outputs the mix of signals 1, 2 and 3, as set by the level controls. This is a quite convenient thing to have around (I did the same sort of thing with my 2040 Filter). For example, if the filters are not being used, this is a handy three input mixer to have - and it can process either audio or control voltages. If the filter is being used, this signal can be used as a send to a sidechain or to some other part of the patch.

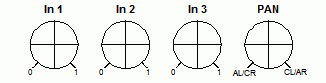
Each filter's output is available through the output connectors pictured above. Again, this allows the filters to be used independently, and also allows the function I mysteriously alluded to above - providing each filter's output allows serial operation between two filters!
Serial operation can accomplish a number of cool things. One obvious application is that it can increase the slope of the filter when chaining two identical types. For example, if the Low Pass output of Filter A is patched into the FiltB In jack, then a 24 dB low pass response is available at the Low Pass output of FilterB (the LP Out B jack). The Wilson SVVCF has a 12 dB response, so for every filter in a series chain (of the same type) the slope increases by 12 dB. So, to further the example, if the Low Pass output of Filter B is patched to the FiltC In jack, then a 36 dB Low Pass response will be available at the low pass output of Filter C (the LP Out C jack).
In order to get the normal slope, the cascaded filters must be set so that their cutoff frequencies are identical, and, if modulation is used, they are modulated identically (this is possible as will be explained later). However, setting the filters to slightly different settings, perhaps one with more or less resonance than the other, or modulating them asymmetrically can lead to a plethora of different sounds.
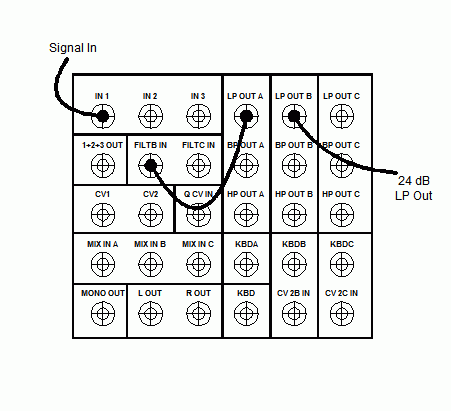
Note that to get the increased slope, like type filters must be cascaded - IE, cascade low pass to low pass or high pass to high pass or band pass to band pass. However, increasing slope is not the only aim of cascading filters. One can, for example, configure a variable bandwidth band pass filter by cascading a high pass filter into a low pass filter. This again leads to some wonderful settings, and the bandwidth can even be voltage controlled with the modules control voltage scheme, which also will be discussed later.
Now that individual and cascade filter operations are covered, we still need the triple resonant output. The default triple resonant mode sums all three filters' band pass response. There are actually two triple resonant outputs - a single mono output jack and a stereo output consisting of right and left output jacks.

Now we can talk about the Pan control =0). It took me a little while to decide on exactly how to handle the stereo output. I finally settled on the method used in the MaM RS3, and the pan control on this module works in the same manner. With the pan control set all the way counterclockwise, the output of Filter A is panned all the way left and the output of Filter C is panned all the way right. With the pan control set all the way clockwise, Filter A is panned all the way right and Filter C is panned all the way left. Filter B is applied equally to each channel, so it always sits "in the middle" of the stereo mix. So, the effect of turning the pan control causes Filter A and Filter B to 'swap places' in the stereo mix, while Filter B remains stationary. This allows any mix from a wide spread to a mono mix on both channels with the pan control set in the center.
The Mono output puts out an equal mix of all three filters, regardless of the position of the pan control.
The three input jacks (Mix In A, Mix In B, and Mix In C) provide another means to further the versatility of the module. As mentioned before, the default triple resonant output is a mixture of the bandpass outputs of all three filters. These outputs are actually normalled to the internal output mixer inputs of the module. Inserting a cable into one of these input jacks breaks that normalled connection and allows the signal on the cable to be fed into the mixer instead.
Signals applied to these input jacks are controlled by the pan control just as the normalled BP inputs are - IE, the signals applied to the Mix In A and Mix In C will pan left and right and the signal applied to Mix In B will stay in the center of the stereo mix. The applied signals will also be mixed to the mono output connector.
As with the input mixer, this mixer can be used independently of the filter, or used as an adjunct to the filter. For example, one can apply different filter responses to the triple resonant effect by merely patching them into these inputs.

In the above example, the low pass output from Filters A and C are patched into the mixer, and the HP output of filter B is also patched into the mixer. Of course, one can merely patch one output of any filter to any input to produce different results - the other inputs are still normalled to their respective filter band pass outputs. In fact, all of the outputs of only one filter can be applied, creating a notch filter.
External signals can be applied as well - either audio or CV. These inputs are not normalled to any level control, so if one should need to control the level, that could be done on another module before being applied to the Triple Wilson SVVCF. In fact, this mixer could be used totally independently, yet still have all three filters simultaneously in operation.

In the above example, two external signals are applied to the Mix In A and Mix In C inputs. The stereo mix of those two signals can be set with the pan control. If one were to just use the left or the right outputs, the mixer would then serve as a crossfader for the two signals by using the pan control. If only one signal is applied to either of these two inputs, then the pan control would work as a level control for that one signal.
If no signal is applied to the signal inputs or the Filter B input, no other signal would be present on the Mono Output jack or the Left and Right Output jacks. If a signal is applied, in this example, to either of those two filter input sources, then the BP signal of Filter B would be present at the output jacks. If one wanted to use all three filters, yet use this mixer for other tasks, and no signal was wanted for any of the unused inputs, a dummy plug could be placed into the unused jack to disconnect it from its respective filter's BP output.
Control Elements
Before proceeding into a description of the control elements for the Triple Wilson SVVCF module, I'll reiterate a couple of the design goals just to keep it clear why I did things the way I did:
First I wanted to be able to control all three filters individually and, second, I wanted to be able to control the filters in tandem as well. With that in mind, I came up with the following scheme.
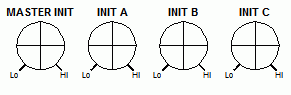
First of all, we'll look at the initial cutoff frequency controls. Each filter has its own control for that, Init A individually controls the cutoff for Filter A, Init B individually Controls Filter B, and Init C individually controls Filter C. The Master Init Control affects the cutoff frequency of all three filters equally.
In other words, once the initial cutoff frequency spacing is set up by the Init A through Init C controls, one can use the Master Init control to adjust all three filters up and down in frequency while maintaining their relative settings. Normally, one would set the Master Init Control to center position, then adjust the initial cutoff frequencies of the filters. Then when a 'global' change in inital freqeuncy was required, the Master Init control can be used to offset the three filters up and down in an equal amount. This saves the task of having to adjust each filter individually up or down while trying to maintain their relative position in the frequency domain.
For independent operation, the Master Init control could be left in the center position. Its main use would be for triple resonant or cascaded filter operation.
CV controls follow the same general concept by using a master control, but the implementation is quite different.

Above we see the controls for the CV1 input. All three of these controls affect how the signal applied to the CV1 jack affects each filter. The CV1 control is a normal attenuator - when set all the way CCW it prevents any amount of the CV1 signal from passing, and when set all the way CW, it allows the full amount of the CV1 signal to pass.
The CV1 signal, *as set by the CV1 control* is then passed to the CV1A, CV1B, and CV1C controls. These controls further manipulate the amount of CV1 that is allowed to pass by the CV1 control. CV1A sends its voltage to Filter A, CV1B sends its voltage to Filter B, and CV1C sends its voltage to Filter C.
The CV1A, CV1B and CV1C are bipolar attenuators. That means they not only determine how much of the CV1 signal is allowed to modulate their respective filters, they also determine the phase of the signal as well - either in phase or 180 degrees out of phase.
When CV1A, CV1B, and CV1C are set to the middle of their ranges, they allow no signal to pass. When they are set full CW, they allow the full amount of the signal received from the CV1 control to affect their respective filters. When they are set full CCW, they still allow the full amount of signal passed from the CV1 control to affect their filters, but in an opposite manner. In the CCW position, if the CV1 control is passing a rising voltage, the controls will convert that to a falling voltage and vice-versa when set to the CW position. Of course, the range of attenuation is fully adjustable. For example, just setting one of these controls just slightly CCW from center will allow a small amount of inverted voltage to pass just as setting it slightly CW from center will allow a small amount of non-inverted voltage to pass.
The main thing to bear in mind is that the three CV attenuators manipulate the amount of CV1 voltage that the CV1 control allows to pass.
For this application, this is a very powerful control configuration. To illustrate, as an example, let's assume we are modulating the filters with a simple triangle wave LFO:
Example 1: CV1A, CV1B and CV1C are all set full CW.
All three filters move up and down in frequency while maintaining the spacing set by the initial frequency controls. The CV1 controls acts as a master control which determines how far each filter's initial frequency moves up and down.
Example 2: CV1A, CV1B and CV1C are all set full CCW.
All three filters move up and down in frequency while maintaining the spacing set by the initial frequency controls, but in the opposite direction of the LFO - when the LFO is rising, the filter cutoff frequencies are falling, and vice versa. The CV1 controls acts as a master control which determines how far each filter's initial frequency moves up and down.
Example 3: CV1A and CV1C are set full CW and CV1B is set to middle of range (full attenuation).
Filter A and Filter C move in tandem maintaining the spacing set by the initial frequency controls, and Filter B remains 'stationary'. This dramatically affects the sound of a triple resonant sweep. The CV1 controls acts as a master control which determines how far Filter A and Filter B's initial frequency moves up and down.
Example 4: CV1A and CV1C are set full CW and CV1B is set full CCW.
Filter A and Filter C move in tandem maintaining the spacing set by the initial frequency controls, Filter B moves by the same amount, but always in the opposite direction as compared to Filter A and Filter C. Again, this dramatically affects the sound of a triple resonant sweep. The CV1 controls acts as a master control which determines how far each filter's initial frequency moves up and down.
Example 5: CV1A, CV1B, and CV1C are set to various different settings.
The triangle LFO now moves each filter's initial frequency in various directions and in varying amount, depending on the settings of each biplolar attenuator. This is another dramatic variation on a single LFO input. The CV1 controls acts as a master control which determines how far each filter's initial frequency moves up and down, but in a non-linear fashion.
Obviously this arrangment lends greatly to triple resonant and cascaded operation. Even in individual filter mode, it may come in handy from time to time.
What makes it an even more powerful arrangement is the addition of a second section that operates exactly as it does.
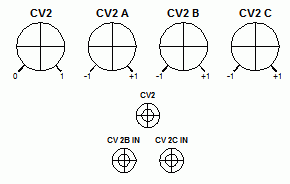
The CV2 section is nearly identical to the CV1 section. Again, the CV2 control is a normal attenuator which variably attenuates and passes the voltage applied to the CV2 connector to the CV2A, CV2B and CV2C controls, all three of which are bipolar attenuators. In this regard, the CV2 section is identical to the CV1 section.
As mentioned, having two sections with this configuration increases the modulation opportunities a great deal. Remember the variable bandwidth bandpass filter mentioned earlier (serial mode, HP into LP)? Having the two CV sections set up in this manner allows one to control not only the passband through CV, it allows one to control the bandwidth with CV as well!
For example let's say we're using filters A and B. Set the initial frequencies of the HP and LP filters to the initial frequency and bandwidth. Patch the bandwidth CV into CV1 and set the CV1A control full CCW and the CV1B control full CW. Patch the any CV into CV2, and set both CV2A and CV2B to full CW. Now, as voltage increases on CV1, the bandwidth spreads, and as voltage decreases on CV1, the bandwidth narrows. As voltage increases on CV2, the passband rises in frequency and as voltage decreases on CV2, the passband decreases in frequency. That's just one application!
Now, there obviously is a bit of a difference with the CV2 section - notice the CV2B In and CV2C In jacks. These jacks are inputs, and they are there to enhance both the individual filter mode of operation and the triple resonance mode of operation.
The CV2 signal is first modified by the CV2 control and is sent to the CV2A, CV2B and CV2C bipolar attenuators, which is the same configuration as the CV1 section. However, the connection between the CV2 control output and the CV2B and CV2C bipolar attenuators is a *normalled* connection. In other words, inserting a cable into the CV2B In jack will disconnect the signal applied to the CV2B bipolar attenuator and pass the signal on the cable into the CV2B bipolar attenuator. That means a unique control voltage can be applied to filter 2B, and the CV2B control will now have bipolar control over this input!
The same thing applies to a signal applied to the CV2C jack, only the CV2C bipolar attenuator will control that CV before it is applied to Filter C.
With this added functionality, all three filters can be operated indvidually from three different control voltage sources. Remember, we still have voltage control of Filter A through the normal channels (both CV1 and CV2). If one doesn't want CV1 to affect filters B and C, then the CV1B and CV1C controls need only be placed in the center position, or the CV1 control can be placed in the full CCW position (which will also prevent filter A from being affected by the CV1 signal).
For triple resonance operation, that means all three filters can be modulated from three different sources as well! In fact, this configuration allows the three filters to be modulated from up to four different sources under control of the CV bipolar attenuators.
But, that's not all........
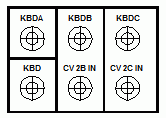
Our remaining frequency control voltage function is the 'KBD' function (KBD is short for 'Keyboard'; just a fancy abbreviation I like to use). It is generally there so that the filter can track a keyboard. It is actually the unattenuated V/Oct input of the filter, and doesn't necessarily have to be connected to a keyboard.
Note that, of course, there is more than one KBD input. There are, in addition to the KBD input, a KBDA, KBDB, and KBDC input. This arrangement is made so that the filters can be easily patched to track individual voltages, or have all three filters track just one voltage (for serial or triple resonant modes, as an example).
I used the same method previously used on my Dual Schmitz Late MS20 filter: the KBD input buffers the control voltage applied to it and normals the buffered signal to the KBDA, KBDB, and KBDC input jacks. So, if only one CV is applied to KBD and no other connections are made to these jacks, then all three filters are controlled in tandem by the signal applied to the KBD input.
If, for example, a cable is inserted into the KBDB input, that normalled connection is broken and now the signal on the cable is used to control filter B, regardless of how Filters A and C are being controlled. Therefore, the filters can track in tandem or individually quite easily. As a bonus, because these inputs also serve as an extra control input, this allows even further diversity in control options - up to seven control voltages can control the filters in various combinations.
This leads us to our last parameter - resonance. Notice, instead of resonance, I have the panel labeled as 'Q' instead - this is a space saving feature mainly, though generally resonance and Q are fairly interchangeable when discussing filters.
The resonance controls are set up just like the initial frequency controls, with one important change which will be discussed momentarily.
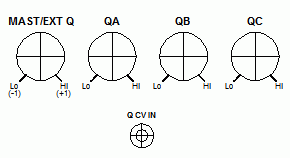
The QA, QB, and QC controls each set the initial resonance for their respective filters. The Master Q control adjusts the resonance of each filter simultaneously and evenly. This way, the relative resonance of each filter can be set, then the Master Q control will increase or decrease the resonance of all three filters at once - this is an invaluable tool when in the triple resonance or cascade modes.
Generally, the Master Q control is set to center position, then the QA, QB and QC controls are set to their initial settings. Once that is done, the Master Q control can increase or decrease the resonance of all three filters at the same time.
Being able to set the resonance of each filter individually is something the original PS3100 resonator did not do. I've found that great effects can be had by setting different resonance values for each filter, so this is a great plus.
Now, the difference in the way this section is structured as opposed to the initial frequency control structure is that this arrangement also allows for voltage control of the resonance.
Notice the Master Q control is *actually* labeled 'MAST/EXT Q' and that it has two scales - high and low or -1 and 1. The Master Q control works in conjunction with the Q CV In input jack. If no cable is plugged into this jack, operation is exactly as described above.
If, however, a cable is plugged into the Q CV jack, the function of the Master Q control changes - it now becomes an External Q control, and it is a bipolar attenuator. That means that now the signal applied to the Q CV jack is processed by this control and applied to each of the three filters evenly. Because it's a bipolar attenuator, it controls both the level of change and direction of change a CV applied to the Q CV jack will have on the filters!
As an application example, consider an envelope generator connected to both the CV1 input and Q CV jack. The module can be set to have a low Q attack and high Q release along with the attack and release of the envelope generator controlling the cutoff frequency. Or the effect can be vice versa, or a combination of increasing and decreasing cutoff frequency with resonance either increasing or decreasing.
This is the one function that I had to scrimp on just a bit because of dwindling panel space - voltage control of resonance will always affect all three filters, so, for individual operation of all three filters on separate signals, bear in mind that controlling the resonance through CV will affect all three filters.